

Pre-sales customer service WeChat


Zebra ZM400 Calibration Printer and Adjustment of Print Head Pressure Method
Release Time:2016-02-11
Zebra ZM400 Calibration Printer and Adjustment of Print Head Pressure Method
Zebra ZM400 Calibration Printer and Adjustment of Print Head Pressure Method
Calibrate the printer: You can set the printer for automatic or manual calibration.
Automatic calibration: When the control panel of MEDIA POWER UP (media power on) or HEAD CLOSE (print head off) is set to CALIBRATION (calibration), the printer will automatically perform calibration when the print head is powered on or off. During the automatic calibration process, The printer determines the label length and sensor settings, and the result of automatic calibration will be stored in the printer's memory, even if the printer power is turned off, the result will not be lost. These parameters are valid until the next calibration is performed.
Note: If the control panel of MEDIA POWER UP or HEAD CLOSE is set to LENGTH, NO MOTION, or FEED, the printer will start printing without automatic calibration.
Manual calibration: Performing a media and ribbon sensor calibration resets the sensitivity of the sensor to more accurately detect media and ribbon. If you change the ribbon and media type, your printer will work better after performing a secondary calibration process.
The sensitivity of the media and ribbon sensors can be adjusted using the following steps:
① Press the SETUP/EXIT button on the control panel
② Press the plus sign () or minus sign (-) to select the "media and ribbon calibration" parameter
③ Press SELECT to select parameters
④ Press the plus sign () to start the calibration process. Display LOAD BACKING
⑤ Open the print head
⑥ Peel approximately 203mm of label from the backing paper and feed the media into the printer so that only the backing paper is between the media sensors
⑦ Keep the print head open
⑧ Press the plus sign () to continue, and the prompt of REMOVE RIBBON (remove the ribbon) will be displayed.
⑨ If a ribbon is used, it should be removed
⑩ Turn off the print head
(11) Press the plus sign () to continue. The CALIBRATING PLEASE WAIT message will be displayed. The printer adjusts the gain of the signal received from the media and ribbon sensors based on the specific media and ribbon combination used, and on the sensor graph, it actually corresponds to the peak of the graph moving up and down for better reading of your printing application. When calibration is complete, RELOAD ALL will be displayed
12 Open the print head and push the media forward to place the label under the media sensor
Re-load the ribbon (if used)
Turning off the print head
Press the plus sign () to continue. The printer performs automatic calibration. During this process, the printer checks the media and ribbon degree according to the newly established scale to determine the ribbon length and print mode. To view the reading on the new scale, you can print a sensor chart.
Press SELECT to accept any changes and cancel parameter selection
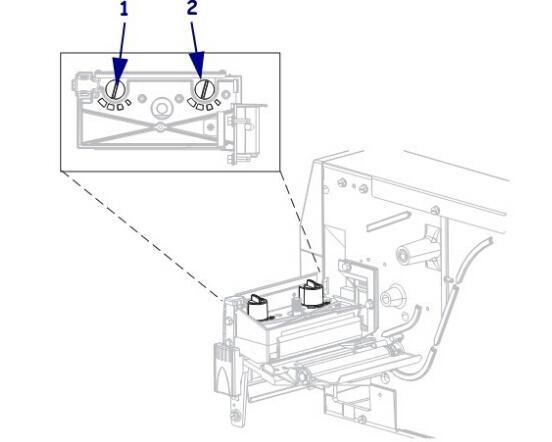
How to adjust Zebra ZM400 barcode print head pressure
If the print color is too light on one side, if the media is too thick, or the media shifts to one side during printing, you may need to adjust the print head pressure.
The ZM400 pressure adjustment wheel has four available settings, which are indicated by the gradually increasing embossed flag blocks on the printing unit. The smallest scale block (maximum counterclockwise rotation) is position 1, and the largest scale block (maximum clockwise rotation) is position 4.
Adjust the position of the inner adjustment wheel 2 and the outer adjustment wheel 1 according to the width of the medium:
● Medium width 25.4mm, inner adjustment wheel in position 3, outer adjustment wheel in position 1
● Medium width 51mm, inner adjustment wheel at position 4, outer adjustment wheel at position 1
● Media width 76mm, inner adjustment wheel at position 3, outer adjustment wheel at position 2
● The medium width is greater than or equal to 89mm, the inner adjustment wheel is in position 3, and the outer adjustment wheel is in position 3
Due to the medium thickness and other reasons need to adjust the pressure adjustment wheel, can be adjusted according to the following methods:
● If the media requires more pressure to improve print quality, increase the two adjustment wheels by one position
● If the media slides to the left while printing, increase the setting of the outer adjustment wheel by one position, or decrease the setting of the inner adjustment wheel by one position
● If the media slides to the right while printing, increase the inner adjustment wheel setting by one position or decrease the outer adjustment wheel by one position
● If the print color on the left side of the media label is too light, increase the inner adjustment wheel by one position
● If the print color on the right side of the media label is too light, increase the outer adjustment wheel by one position
Focus on us
Official Account
Pre Sales
After Sales
National Service Hotline
Complaint suggestion:+86 13530144755
Enterprise E-mail:wanglili@xingyongli.com
Links:Shenzhen Hongxing Yongli Electronic Technology Co., Ltd.(Apply for friend chain plus QQ:2355671558)
©2024 Shenzhen Hongxing Yongli Electronic Technology Co., Ltd Powered by www.300.cn